CyberLink PowerDirector Help
On the Properties tab in the PiP Designer you can change the properties of a media clip, including modifying its position or opacity, or applying a shadow or border. On this tab you can also apply a green screen effect using the chroma key feature.
To access the media clip properties in the PiP Designer, select a video clip, image, or PiP object on the timeline, click the Tools button, and then select PiP Designer. Click on the Properties tab in the PiP Designer to see the following properties you can modify on this tab.
Note: while modifying the effect properties, you can select the Only show the selected track option to hide any other media that is displayed in the preview window. |
Changing Object Settings
Use the Object Settings option to change some of the basic properties of the media clip.
Note: you can move the location of the media clip's anchor point, which changes how these controls affect the media clip's object properties. |
Position
Use the X and Y position fields to set the precise location of the media clip's anchor point on the video image. When used with keyframes, you can manually create motion of the media clip.
Note: CyberLink PowerDirector sets the value of the top-left corner of the media clip as the 0 axis, with the bottom-right corner having a value of 1.0, 1.0. The center position in the video frame is 0.500, 0.500. You can more easily adjust clip position and motion on the Motion tab. See Adding Motion to Media Clips for motion information. |
When you create motion for media clips, you indicate where (Position) on the video image you want the media clip to appear by adding keyframes. To create the motion, CyberLink PowerDirector will ensure the media clip is in the desired position at the specified time (keyframe).
Scale
Use the Scale sliders to zoom in on the PiP media's anchor point, or change the media clip's size.
Note: select the Maintain aspect ratio option if you want to ensure the media clip's aspect ratio does not change while you are moving or resizing it. Deselect this option if you want to change the media clip's shape or alter its aspect ratio. |
Opacity
Use the Opacity sliders to adjust the transparency of the media clip. You can also set the media clip's Blending Mode, or how it is blended with the clip above it in the timeline. See Blending Mode (Blending Clips on the Timeline) for more details.
Rotation
To rotate the media clip around its anchor point, input the rotation amount in the Rotation field and then press the enter key on your keyboard.
Ease In/Ease Out
Creating motion for a media clip by changing the Position, Scale, or Rotation object settings at different keyframes can cause it to appear jerky as it speeds up and slows down when it moves through the frame, changes its size, or rotates in the video frame. To make the movement look smoother, use the Ease in/out options. Select Ease in to slow down the media clip as it enters a keyframe. Select Ease out if you want it to gradually accelerate out of the keyframe.
Anchor Point
Select the Display anchor point option to enable the anchor point on a media clip. You can use the X, Y controls to adjust the position of the media clip's anchor point, or just click and drag it to a new position. The anchor point cannot be dragged outside the clip's borders.
Note: you can use keyframes to customize each of these object settings. See Utilizing PiP Keyframes for more information. |
Modifying 360º Position
When editing 360º video projects, the Longitude and Latitude position sliders are available for 360º media so you can customize the 360º position of in the 360º environment. Use these sliders to move the media clip to the desired position, or just click and drag it around the 360º environment. When used with keyframes, you can manually create motion of the media clip in the 360º environment.
Note: if you are using non-360º media in your 360º video project, you must first convert it to 360º if you want to customize its 360º position. |
Using Chroma Key
Use the Chroma Key option to add a chroma key (green screen) effect to your media clip. Using this feature you can remove a color (usually a solid green color) in your video clip or image, revealing a different background for the subject of the video.
To add a chroma key (green screen effect), do this:
1.Select a video clip, image, or PiP object on the timeline, click the Tools button, and then select PiP Designer.
2.On the Properties tab enable the Chroma Key option.
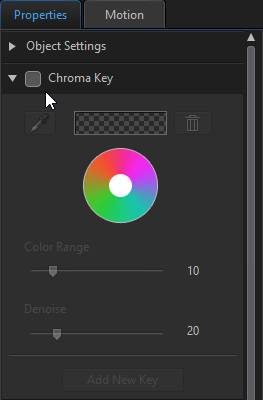
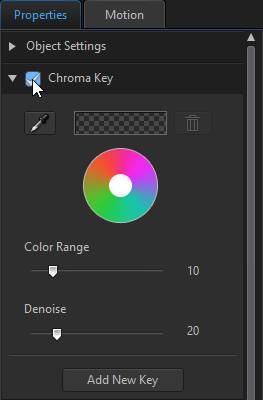
3.Click on  and then select the color in the video clip or image that you want to replace/make transparent.
4.If required, use the Color range slider to adjust range of color that is removed. Adjusting this slider can remove or add back color in the video that was removed.
5.Use the Denoise slider to fine tune the edges of the media clip on the revealed background. Using this slider can make the effect look more authentic by sharpening the edges and removing excess pixels.
If there are other colors in the media clip that you want to remove, click the Add New Key button to add more chroma keys to your video. Repeat the steps above to remove the secondary colors as required.
Applying a Border
Select the Border option to add a border around the media clip. Use the Size slider to set the width of the border, and the Blur and Opacity sliders to customize its appearance.
Selecting Border Color
When selecting the color of the border, you have the following options in the Fill type drop-down:
•Uniform color: select this option if you want the border to be one solid color. Click the colored square to open the color palette and select the desired border color.
•2 color gradient: select this option if you want the border color to change from one color to another using a gradient. Click the colored squares to set the beginning and ending colors, and then drag the Gradient direction control to set which way the color flows.
•4 color gradient*: select this option if you want the border to consist of four colors. Click the colored squares to set the colors in each of the four corners of the border.
Note: * optional feature in CyberLink PowerDirector. Check the version table on our web site for detailed versioning information. |
Applying a Shadow
Select the Shadow* option to add a shadow on the media clip. Once selected, choose whether to apply the shadow on the Object Only, or the Object and Border, if you applied a border. Select Border Only to just display the shadow of the applied border. Use the other available options to change the shadow's color, direction, and distance from the effect. You can also set the opacity and blur levels of the shadow using the available sliders.
Note: * optional feature in CyberLink PowerDirector. Check the version table on our web site for detailed versioning information. |
Adding a Reflection
Select the Reflection option to reflect the media clip onto the background media. Use the Distance slider to set space between the reflection and the media clip. Use the Opacity slider to set the opacity of the reflection.
Flipping PiP Media
Select the Flip option to flip the media clip upside down or from left to right, depending on your requirement.
Enabling 3D Depth
If you are creating a 3D video production, select the 3D Settings* option to give the media clip a 3D effect.
Note: when using this feature, enable 3D mode for the best editing results. See Enabling 3D Mode for more information on using this mode. * Optional feature in CyberLink PowerDirector. Check the version table on our web site for detailed versioning information. |
Once enabled, use the slider to set the amount of depth you want the media clip to have in 3D. Dragging the slider left will make the media clip seem nearer to the audience (in the foreground), while dragging it right will make it appear farther away (in the background).
Note: you can use keyframes to customize when the 3D depth is applied. See Utilizing PiP Keyframes for more information. |
Applying a Fade
Select the Fade option to apply a fade effect on the media clip. See Creating a Fade in the PiP Designer for more detailed information about this feature.
Note: when a fade is applied, note that keyframes are added to the Opacity keyframe timeline so you can customize the length of the fade, if required. See Utilizing PiP Keyframes for more information. |