CyberLink PowerDirector Help
PowerDirector 365 Business users can use the Ad Designer* to quickly and easily create promotional videos for their businesses that stand out.
Note: * this feature is only available in PowerDirector 365 Business. |
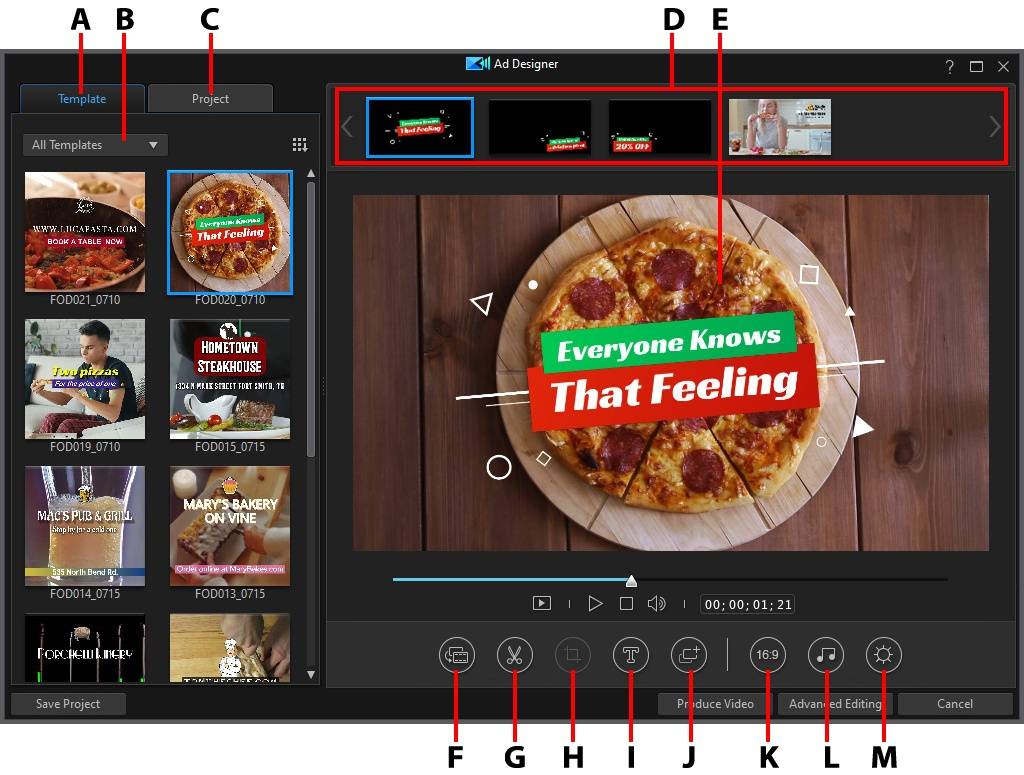
A - Ad Templates |
B - Ad Categories |
C - Ad Projects |
D - Scenes |
E - Preview Window |
F - Replace Media File |
G - Trim Media |
H - Crop Media |
I - Add Title Text |
J - Add Scenes |
K - Change Project Aspect Ratio |
L - Edit Background Music |
M - Settings |
|
|
|
In the Ad Designer you can select from a number of ad templates to create a promotional video. See Types of Ad Templates for information on the two types of templates you can use.
To create a promotional video in the Ad Designer, do this:
1.Select Ad Designer from the Plugins menu.
Note: you can resize the ad template thumbnails by clicking the |
 button and then selecting a default size from the menu.
2.Use the ad categories to filter the ad templates by business type, and then select a template on the Template tab.
Note: you can hover your mouse over an ad template and then select the heart in the bottom right corner to add it to your favorites. You can then more quickly find that template next time in ad categories by selecting My Favorites. |
3.When you first select an ad template after entering the Ad Designer, you are asked to set the project aspect ratio for your promotional video. You can choose between 16:9, 9:16, or 1:1. If required, you can change the aspect ratio later by clicking the change project aspect ratio button.
4.Use the playback controls to preview the selected template. Once you find a template you want to use, select a scene to edit it.
Note: click the |

 to preview just the currently selected scene.
5.Click  to replace the media files in an ad template or scene by importing your own content or downloading media from Shutterstock®. See Replacing Media with Imported/Downloaded Content for more details.
6.Click  to trim the imported/downloaded media files. See Trimming Video Clips in a Scene for more details.
7.Click  to crop the imported/downloaded media files. See Cropping Media Clips in a Scene for more details.
8.Click  to add and edit title text in your promotional video. See Adding and Editing Text in a Scene for more details.
9.If your ad template has scenes, click  to add more scenes and color boards to your promotional video. See Adding Scenes for more details.
10.Repeat steps 5-8 for each scene in your promotional video.
11.Click  to edit the existing background music in your promotional video, or to use different music. See Editing Background Music for more details.
12.When you are done, click Produce Video to output your promotional video. Click Advanced Editing if you'd like to perform some more advanced editing on your production in the edit module.