CyberLink PowerDirector Help
When you edit a video in CyberLink PowerDirector, the program keeps a log of all the changes (video edits, added effects, titles, transitions, etc.) in the saved .PDS project file. Once you are done editing your video, you need to produce the project in the Produce module to render a new video file.
The following is an overview of all the things you'll need to know about video producing for the best results when outputting your project to a video file.
What is Video Rendering?
Let's start out with the basics and explain the video rendering process. When you produce your video, CyberLink PowerDirector takes the log of requested edits (crops, trims, etc.) to all of the media files in your project and added content (music, transitions, effects, titles, etc.), and then renders them to make a new single video file. The rendering process is required to view the final video in a video player outside of PowerDirector. When you output your video to YouTube or burn it to a disc, PowerDirector must first render the video file before uploading or burning.
The video quality and size of the rendered video file is determined by the following factors:
•Length of your video project. The longer the project, the larger the outputted file size.
•Video codec and file format used to render the project.
•Video profile used, which determines video quality (resolution, framerate, and bitrate).
Video Codecs
When you produce your project, CyberLink PowerDirector uses a video codec to encode (render) a new video file. The video codec helps determine the video quality and size of the video, as some codecs are better at compressing video than others. In CyberLink PowerDirector you can use the following codecs for rendering video:
Codec |
File Extensions (Containers) Available |
Description |
|---|---|---|
H.264 AVC
|
.m2ts, .mp4, .mkv |
H.264 AVC is one of the most popular codecs used to create videos in the MPEG-4 format. It is known for rendering video files that have relatively small sizes, but with great video quality (4K/2K/full HD). If you are not sure what format or codec you should use, choose this one (and the .mp4 container) because it is widely accepted by social media sites and playable in most video players. |
H.265 HEVC
|
.m2ts, .mp4, .mkv |
The H.265 HEVC codec is a newer MPEG-4 format that creates even smaller video files sizes, without giving up anything in video quality. Less accepted than the H.264 codec, be sure that the destined video player supports H.265 playback before using this codec. |
Windows Media
|
.wmv |
The Windows Media codec is from Microsoft and can create extremely small file sizes, but with a lower quality compared to most other codecs. The outputted files are mainly designed for playback on Windows computers. |
XAVC S |
.mp4 |
The XAVC S is a codec from Sony that produces high quality videos in the MPEG-4 format. The codec is mainly intended for use for consumer products and professional video editors. |
AVI |
.avi |
AVI creates great quality video, but with extremely large files sizes. The AVI profile options are rather limited in PowerDirector, so we suggest using one of the newer MPEG-4 codecs. |
MPEG-2 |
.mpg |
MPEG-2 is an older video format that is best known as the video codec used for DVD video. |
File Extensions (Containers)
File extensions, or video "containers", are what all of the elements of a rendered video (video and audio streams, metadata, subtitles, etc.) are stored in. As shown above, only the H.264 and H.265 codecs allow you to choose the file extension.
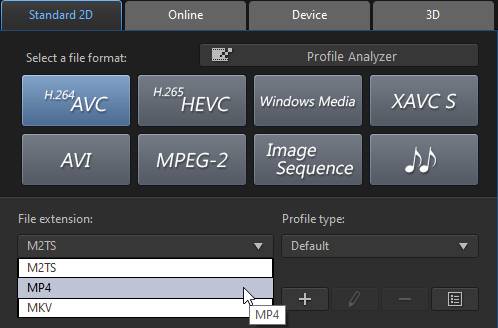
If you are not sure which one to choose, select the .mp4 option as it is the most widely accepted.
Video Profiles (Resolution, Framerate, and Bitrate Explained)
Videos profiles determine the overall quality of the rendered video. After selecting a video codec for your video, you should next select the video profile, which will determine its resolution (4K, 2K, HD), framerate, and bitrate.
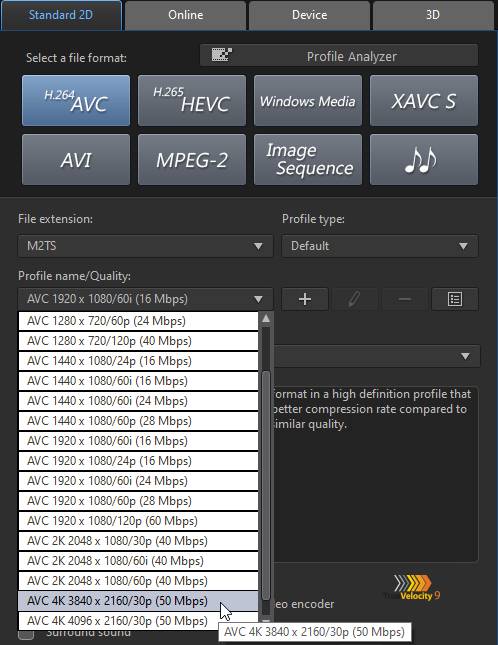
In the above example, the profile AVC 4K 3840x2160/30p (50 Mbps) is being selected. AVC is the codec that will render a 4K resolution file. Resolution indicates the number of video pixels that will be in the video image (3840x2160), so the higher the resolution the better the video quality.
30p indicates that the video file will display 30 (progressive) frames per second, but you can see that this codec's default profiles support up to 60 frames per second. The higher the framerate, the smoother the video playback. For the best results, the framerate you select should match the framerate of the original video clips in your video project.
The video bitrate (50 Mbps) is the amount of data (elements of the video) encoded in the video per second. The higher the bitrate, the better the video quality. The bitrate should also match the bitrates of the original video clips in your project.
Once you get more familiar with video editing and video profiles, you can create your own custom video profiles for certain codecs. Creating video profiles allows you to customize the resolution, framerate, and bitrate, as well as specifying the audio compression used for the video file.
Profile Analyzer
If all this information about producing videos seems a bit too overwhelming, don't worry. CyberLink PowerDirector has a feature that will assist you to select the best codec and video profile for your specific video project. Based on the source format of the original video clips in your project, CyberLink PowerDirector will suggest which codec and profile to use. See Profile Analyzer for more information.