CyberLink PowerDirector Help
Click on the  tab to change the properties of text objects (disc menu text, text menu buttons, or inserted title text). You can also change the properties of images you added into the disc menu.
Note: you cannot edit the disc menu text or text menu button content in Menu Designer window. You must edit this text in the disc menu preview window. See Editing Disc Menu Text for more information. |
Applying Preset Character Types to Text Objects
Select the Character Presets option to apply a defined character preset to a text object. After you have applied a defined character preset you can refine it using the other properties on the tab, if required.
To apply a character preset to a text object, ensure the text box is selected in the preview window and then click on a character preset in the list.
Note: once you are done customizing all of the text properties on the tab, click on |
Customizing Font Type
Select the Font Type option to set the font type and size of the selected text object. You can also select the font face color, bold or italicize text, change the line and text spacing, and set the text alignment in the text box.
If the font type you are using supports it, you can select the Kerning check box to reduce the space between the letters in the text.
Customizing Font Face
In Font Face you can customize the font color, blur, and opacity. Select to enable the font face properties on the selected text object, and then use the Blur and Opacity sliders to customize its appearance.
When customizing the font face color, you have the following options in the Fill type drop-down:
•Uniform color: select this option if you want the font to be one solid color. Click the colored square to open the color palette and select the desired font color.
•2 color gradient: select this option if you want the font color to change from one color to another using a gradient. Click the colored squares to set the beginning and ending colors, and then drag the Gradient direction control to set which way the color flows.
•4 color gradient*: select this option if you want the font to consist of four colors. Click the colored squares to set the colors in each of the four corners of the text.
Note: * optional feature in CyberLink PowerDirector. Check the version table on our web site for detailed versioning information. |
Using Chroma Key
Select the Chroma Key option and then Apply chroma key to add a green screen effect to an image you added to the disc menu. Once enabled, do this:
1.Click on  and then select the color in the image that you want to replace/make transparent.
2.Adjust the Tolerance of hue, Tolerance of saturation, and Tolerance of luminance sliders to remove the selected color. Adjust until the background behind your inserted image is completely revealed, without any loss of quality on the image.
3.Use the Edge sharpness slider to fine tune and sharpen the edges of the inserted image on the revealed background.
Adding a Reflection
Select the Reflection option to add a reflection of a selected text object or added image onto the background media. Use the Distance slider to set space between the reflection and the object. Use the Opacity slider to set the opacity of the reflection.
Applying Shadow
Select the Shadow option to add a shadow to selected text object or an added image. Once selected, choose whether to apply the shadow on the Text/Object Only, or the Text/Object and Border, if you applied a border. Select Border Only to just display the shadow of the applied border. Use the other available options to change the shadow's color, direction, distance from the object, and add an opacity or blur effect.
Applying Border
Select the Border option to add a border around a selected text object or an added image. Available options allow you to change the border's size, and add a opacity or blur effect.
You can customize the border color using the following options in the Fill type drop-down:
•Uniform color: select this option if you want the border to be one solid color. Click the colored square to open the color palette and select the desired border color.
•2 color gradient: select this option if you want the border color to change from one color to another using a gradient. Click the colored squares to set the beginning and ending colors, and then drag the Gradient direction control to set which way the color flows.
•4 color gradient*: select this option if you want the border to consist of four colors. Click the colored squares to set the colors in each of the four corners of the border.
Note: * optional feature in CyberLink PowerDirector. Check the version table on our web site for detailed versioning information. |
Enabling 3D Depth
If you are creating a 3D video production, select the 3D Settings* option to give a selected text object or an imported image a 3D effect.
Note: when using this feature, enable 3D mode for the best editing results. See Enabling 3D Mode for more information on using this mode. * Optional feature in CyberLink PowerDirector. Check the version table on our web site for detailed versioning information. |
Once enabled, use the slider to set the amount of depth you want the object to have in 3D. Dragging the slider left will make the 3D object seem nearer to the audience (in the foreground), while dragging it right will make it appear farther away (in the background).
Applying Fades to Images
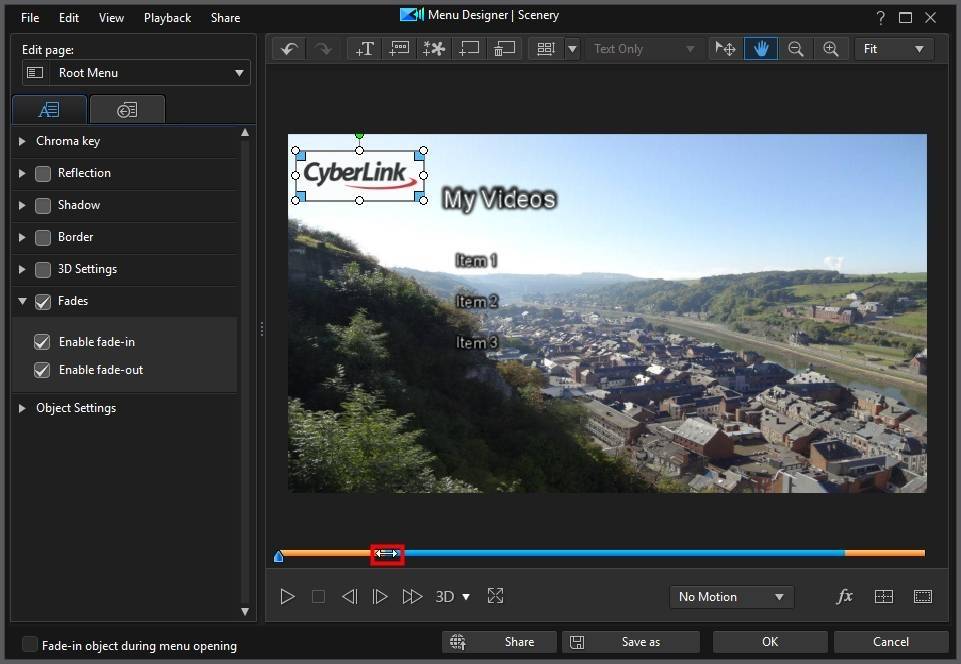
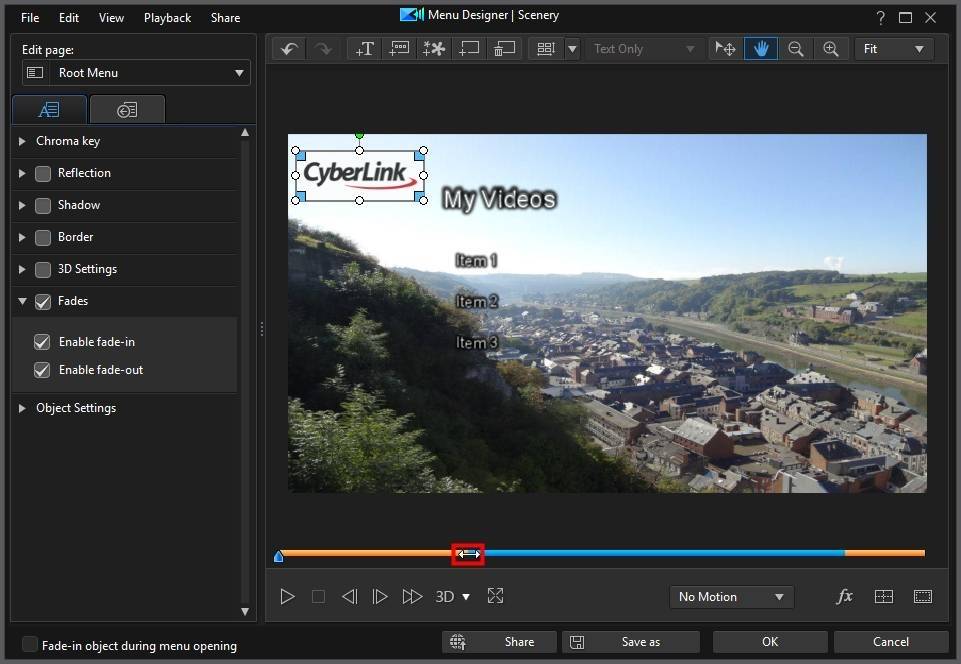
If your disc menu contains an added image, select it and then the Fade option to apply a fade effect on it. Select whether to enable a fade-in and/or fade-out on the image.
You can adjust the fades by clicking and dragging the keyframes below the preview window.

The section in blue is how long the image displays, while the orange parts are the fade in and out. Shortening the orange parts will make the fade in or out happen more quickly, so you can customize the fade as required.

Changing Object Settings
Use the Object Settings option to change some of the basic properties of text objects and inserted images. Use the X and Y position fields to set the precise location of the middle of the object on the disc menu.
Note: CyberLink PowerDirector sets the value of the top-left corner of the object as the 0 axis, with the bottom-right corner having a value of 1.0, 1.0. The center position in the disc menu is 0.500, 0.500. |
Use the Scale sliders to change an object's size, or Opacity to make it more transparent.
Note: select the Maintain aspect ratio option if you want to ensure the object's aspect ratio does not change while you are moving or resizing it. Deselect this option if you want to change the object's shape or alter its aspect ratio. |
To rotate an object, hover your mouse over  , click and then drag your mouse left or right as required. You can also manually enter a rotation amount in the Rotation filed and then press the enter key to rotate it.
 to save the character preset to your favorites. To find and use saved character presets, select