CyberLink PowerDirector Help
The Video Speed Designer* let's you change the speed (slow motion or fast motion) of an entire video clip, or just a selected range using time shifts.
Note: * optional feature in CyberLink PowerDirector. Check the version table on our web site for detailed versioning information. |
To access this feature, select a video clip on the timeline, and then select Tools > Video Speed.
Note: you can also hold down the Ctrl key on your keyboard and then click and drag the edge of a video or audio clip on the timeline to manually change its speed to fit your required duration. |
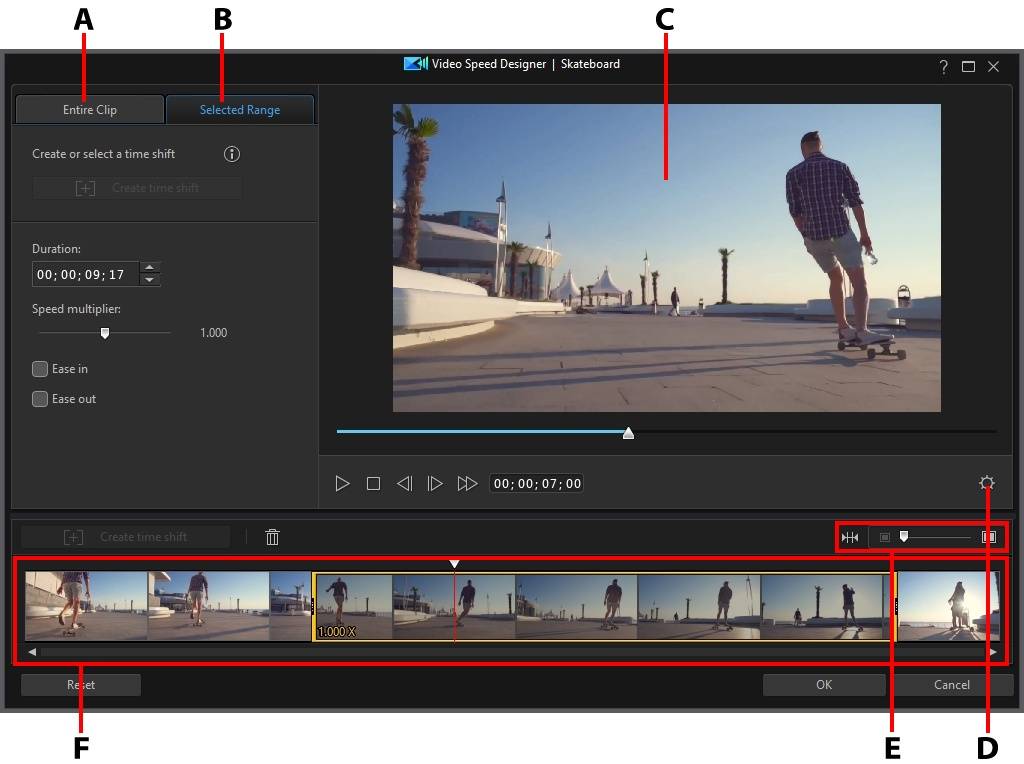
A - Change Speed for Entire Clip |
B - Change Speed for Selected Range |
C - Preview Window |
D - Video Speed Designer Settings |
E - Zoom on Timeline |
F - Video Speed Designer Timeline |
When you are done changing the video clip's speed, click the OK button to save your changes. Your changes are applied to the video clip and updated on the video timeline.
Changing the Speed for an Entire Clip
Click on the Entire Clip tab if you want to change the speed of the entire video clip, i.e. slowing down or speeding up the video. To change the clip's speed, enter the desired video length in the New video duration field. You can also use the Speed multiplier slider to manually speed up or slow down the video clip. Drag it left to slow down the clip, or right to speed it up.
Use the player controls to preview the results of adjusting the clip's speed. Configure the Video Speed Designer Settings to ensure you get your desired results. You can click the Reset button at any time to undo your changes.
Changing the Speed for a Selected Range
Click on the Selected Range tab in the Video Speed Designer to change the speed of the clip for just a selected range of the video using a time shift.
Note: before you finish changing the speed for a selected range, configure the Video Speed Designer Settings to ensure the best output results. |
To change the video speed (slow motion or fast motion) using a time shift, do this:
1.On the Selected Range tab, use the player controls or drag the Video Speed Designer timeline slider to the position in your video clip where you want the time shift to start.
Note: use the zoom controls above the Video Speed Designer timeline to zoom in on the video clip's timeline to more precisely add the time shift. |

2.Click on the Create time shift button. CyberLink PowerDirector will create the time shift, which is indicated in orange on the timeline.

3.If required, drag each end of the time shift so that it covers the segment of the video you want to add the effect to.

Note: the length of the original time shift is dependent on how much you have zoomed in on the Video Speed Designer timeline. |
4.Change the video speed as required (see below) for the time shift segment (selected range).
Note: you can create more than one time shift on a video clip. Just repeat the above steps to add another. |
Speed Effect
Make sure the created time shift is selected on the Video Speed Designer timeline and enter a new Duration for the selected range in the field provided, or use the Speed multiplier slider. Drag it left to slow down the segment, or right to speed it up.
When you apply a speed effect to a selected range, by default the change in the speed in the video is instantaneous once the timeline slider enters the time shift. If you want it to be more gradual and look smoother, you can use the Ease in/out options. Select Ease in if you want the change of speed at the beginning of the time shift to gradually speed up/slow down to the specified speed. Select Ease out if you want the video to gradually return to the original video speed at the end of the time shift.
Video Speed Designer Settings
Click the  button in the Video Speed Designer window to open the settings window. The available options are as follows:
Audio setting:
•Remove audio: select this option if you want to mute the audio in the entire video clip.
•Keep audio: select this option if you want to keep the audio in the edited video clip. Select the Keep audio pitch (05X to 2X only) if you are changing the speed of the video. Selecting this will stretch the audio to match the new video's length, minimizing the warping of the sound as the video speed changes.
Interpolation setting:
•Apply interpolated technology when available: select this option when reducing the speed of the video. CyberLink PowerDirector uses frame interpolated technology* to create a more advanced and smooth slow motion effect.
Note: * optional feature in CyberLink PowerDirector. Check the version table on our web site for detailed versioning information. |