CyberLink PowerDirector Help
To create a video collage do this:
1.Select Plugins > Video Collage.
Note: if required, you can first synchronize the audio in the video clips you want to use in your collage in the MultiCam Designer, and then import them directly into the Video Collage Designer. |
2.All the videos and images that are in the media library are loaded into the Video Collage Designer. If required, click Import Media to import more.
Note: select the All Media drop-down to filter the available media. You can also choose to use a color board in your video collage by selecting it in this drop-down. |
3.Choose a layout by selecting a collage template. Use the  and
and  arrows to scroll through all the available collage templates, or click
  to view them all in the collage template library window. Select a template and then click the play button to preview its frame animation.

Note: if required, you can click |

4.Drag the media clips you want to use into the available frames as required.
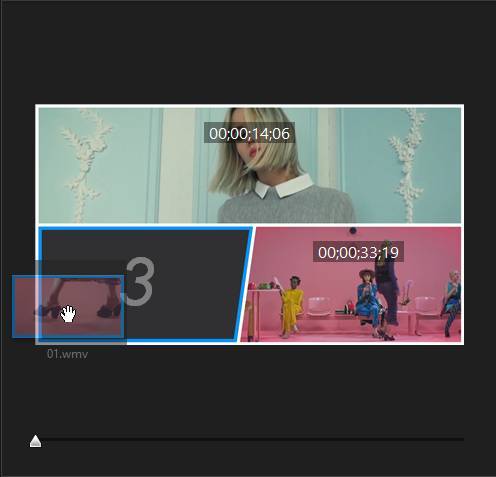
Note: the playback order of the clips is indicated by the ordinal numbers in the template. |
5.After a media clip is added to a collage template's frame, you can reposition it by clicking and dragging it within the frame.


6.Click  if you want to perform a single trim on a video clip, or click
  to mute the clip. For images, click
  to set the duration they are displayed. Use
  to zoom in or out on the clip as required.
7.Set the collage template preferences as follows:
•Border: select this option if you want there to be a border on each of the clip's frames in your video collage. Once selected, set the Size and Color of the border. Use the Interclip size slider to increase the space between the clips in the template. From the Fill type drop-down, you can give this space a solid uniform color, or import an image to give it some texture.
•Frame animation: select whether you want the frame animation to start at the beginning (From Beginning), or during the closing (During Closing) of the video. Select Off to disable frame animation.
•Start clip playback: if your collage includes frame animation, indicate whether the clips start playing back with the frame animation, or once the animation is complete.
•Before/after clip playback: if the video clips in your video collage don't all start at the same time, or end before the collage does, use this option to select what will display in the frame before playback starts or after it ends.
8.Click the Advanced Settings button to configure the playback settings for the video collage.
9.Use the player controls to preview your video collage. Once you are satisfied, click OK to close the Video Collage Designer and add the created video onto the first track in the timeline.
Note: you can edit the saved video collage further by clicking on it in the timeline and then clicking on the Video Collage function button above the timeline. |
Configuring Video Collage Playback Settings
When in the Video Collage Designer, click the Advanced Settings button to configure the playback settings as follows:
•Playback timing: you can choose to have the imported clips play all at once, or one after the other. You can also delay the playback of the secondary clips by the inputted time. If you first synchronized the audio in your clips in the MultiCam Designer, the From MultiCam Designer is auto selected for you.
•Match collage duration to: from this drop-down, set the duration of your video collage by selecting one of the available options. If you first synchronized the audio in your clips in the MultiCam Designer, this feature is not available.