CyberLink PowerDirector Help
To trim a video clip, select it in the timeline and then click the  button above the timeline.
Performing a Single Trim
Use the video trim function to quickly trim off unwanted portions at the beginning and end of a video clip on the timeline.
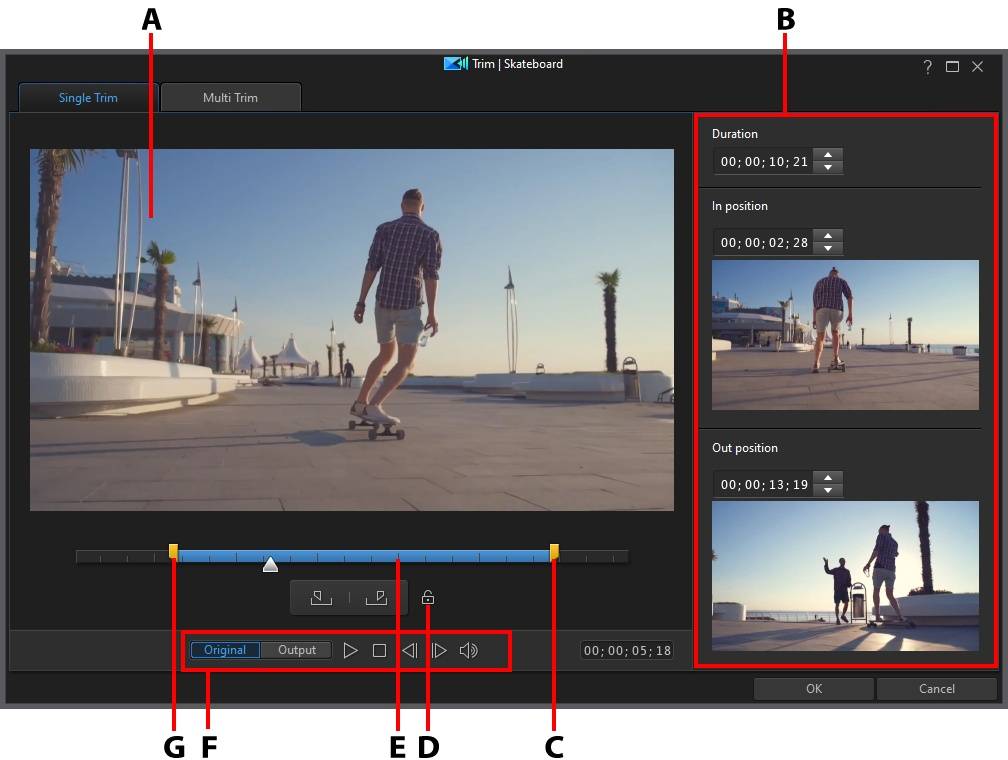
A - Preview Area |
B - Marked Positions in Clip |
C - Mark Out Position Slider |
D - Lock Duration |
E - Selected Content |
F - Player Controls |
G - Mark In Position Slider |
|
To trim a video clip, do this.
1.Select the video clip on the timeline you want to trim, and then click on the button above the timeline.
2.If required, click on the Single Trim tab.
3.Use the player controls to find where you want the trimmed clip to begin, and then click  to set the mark in position. You can also drag the mark in position slider to this position.

4.Use the player controls to find where you want the trimmed clip to end, and then click  to set the mark out position. You can also drag the mark out position slider to this position.

Note: you can click |

5.If required, you can preview what the trimmed clip will look like by clicking Output and then clicking the play button on the player controls. Click Original if you want to play the original video.
6.Click OK to set your changes and trim the clip.
Note: you can reenter the trim window to refine the trimmed clip at any time. You can also drag the trimmed edges of a video clip on the timeline as well. |
Performing a Multi Trim
The multi trim function lets you trim out one or more segments of a video clip at once, resulting in a series of clips that are independent from the original video.

A - Preview Area |
B - Timeline |
C - Timeline Magnifier* |
D - Selected Segment |
E - All Selected Segments |
F - Magnifier Controls* |
G - Trimming Tools |
H - Player Controls |
I - Frame Display |
|
|
|
Note: * optional feature in CyberLink PowerDirector. Check the version table on our web site for detailed versioning information. |
To perform a multi trim on a video clip, do this.
1.Select the video clip on the timeline you want to trim, and then click on the button above the timeline.
2.Click on the Multi Trim tab.
3.If required, use  and
and  to change the magnification level on the video clip. You can magnify the timeline down to each individual frame for a more precise edit. The size of the timeline magnifier changes based on the magnification level set.
4.Use the player controls to find the beginning of the first trimmed segments, or the mark in position.
5.Click to set the mark in position.
6.Use the player controls or drag the timeline slider to position where you want the first segment to end, and then click to set the mark out position. The trimmed segment is added to Selected Segments section.
7.Repeat the above steps to trim out all the required segments.
8.If required, you can preview what the trimmed clip will look like by clicking Output and then clicking the play button on the player controls. Click Original if you want to play the original video.
9.Click OK to set your changes and trim the clip.
Note: the segments of video that CyberLink PowerDirector inserts into the timeline are indicated in blue. If you want to remove these segments from the trimmed video clip, click the |

Extra Trimming Tools
On the Multi Trim tab, you can also use the following extra trimming tools to:
•you can manually drag the mark in and out sliders on the timeline or magnified timeline to edit the current positions if required.
•detect all the scenes in the selected video clip by clicking on  . Once selected, choose whether you want the program to add all the scenes to the trimmed segments area, or just mark the scene breaks for you on the timeline.