CyberLink PowerDirector Help
Click on the Effect tab in the Action Camera Center to highlight action sequences in your videos clips with time shifts and freeze frames. Time shifts let you replay, reverse, or alter the speed of key moments in your videos, while freeze frames pause and zoom in on the action.
Note: before you finish creating your action effects, configure the Action Camera Center Settings to ensure the best output results. |
Creating Time Shifts
Time shifts let you highlight action in video clips by adding slow motion or replays on key moments. To create a time shift, do this:
1.On the Effect tab, use the player controls or drag the Action Camera Center timeline slider to the position in your video clip where you want the time shift to start.
Note: use the zoom controls above the Action Camera Center timeline to zoom in on the video clip's timeline to more precisely add the time shift. |
2.Click on the Create time shift button. CyberLink PowerDirector will create the time shift, which is indicated in orange on the timeline.

3.If required, drag each end of the time shift so that it covers the segment of the video you want to add the effect to.

Note: the length of the original time shift is dependent on how much you have zoomed in on the Action Camera Center timeline. |
4.Apply the effect as required (see below) to the time shift segment.
Note: you can create more than one time shift on a video clip. Just repeat the above steps to add another. |
Replay
In the Replay section, select the Apply replay and reverse option if you want to loop the selected segment of video in the time shift. Once selected, indicate how many times you want the segment to play by setting it in the Play times field. Select the Add reverse effect option if you want the video to reverse forward and backward as it loops playback.
Speed
In the Speed section, select the Apply speed effect option to speed up or slow down just the selected segment of video in the time shift. Once selected, you can enter a new Duration for the segment in the field provided, or use the Speed multiplier slider. Drag it left to slow down the segment, or right to speed it up.
When you apply a speed effect to a segment of video, by default the change in the speed in the video is instantaneous once the timeline slider enters the time shift. If you want it to be more gradual and look smoother, you can use the Ease in/out options. Select Ease in if you want the change of speed at the beginning of the time shift to gradually speed up/slow down to the specified speed. Select Ease out if you want the video to gradually return to the original video speed at the end of the time shift.
Note: if you also selected the Apply replay and reverse option, in the Apply effect to drop down select whether to apply the speed effect to the first or last play of the time shift segment. |
Stop Motion
Select the Stop Motion tab and then the Apply stop motion option to add a stop motion effect on the selected segment of video in the time shift. This effect pauses on a frame of video for a specified number of frames, before jumping to the current frame of video. Drag the slider right to increase the number of frames the video will pause for, or drag it left to reduce the number of frames.
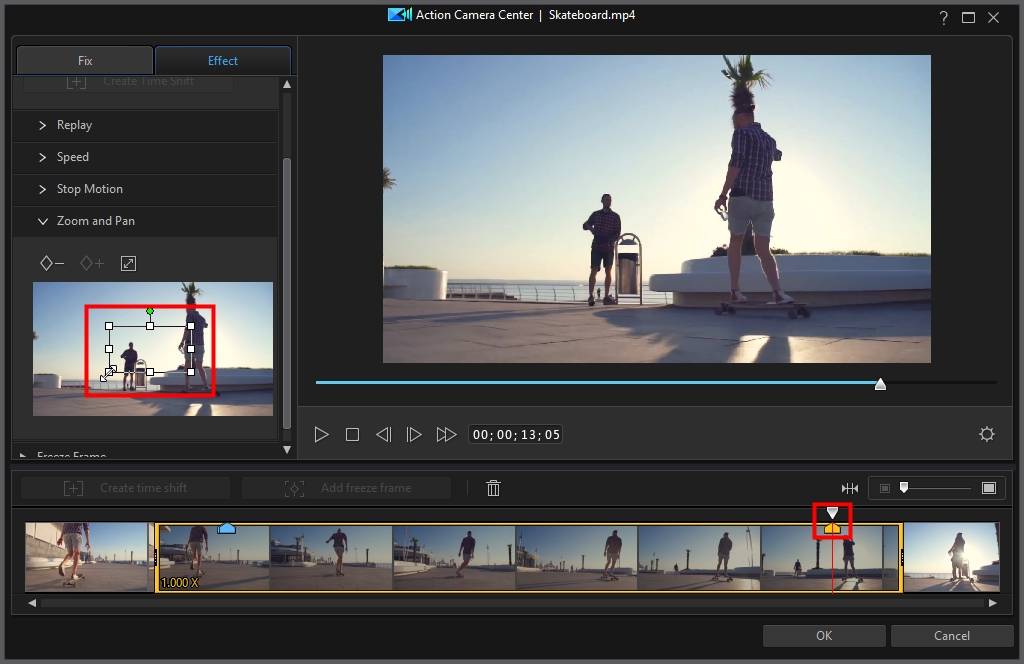
Zoom and Pan
In the Zoom and Pan section you can add zooms and pans on the selected segment of video in the time shift.
To add a zoom and pan in a time shift segment:
1.Drag the timeline slider to the moment in the segment where you want to be zoomed in/out on a portion of the video frame, and then click  to add a keyframe marker.

2.Resize and move the focus area box as required. Make it smaller to zoom in on a portion of the video, or make it larger to zoom out. Moving the focus area box will add a pan as the camera moves to the location of the box by the time the timeline slider reaches the keyframe.
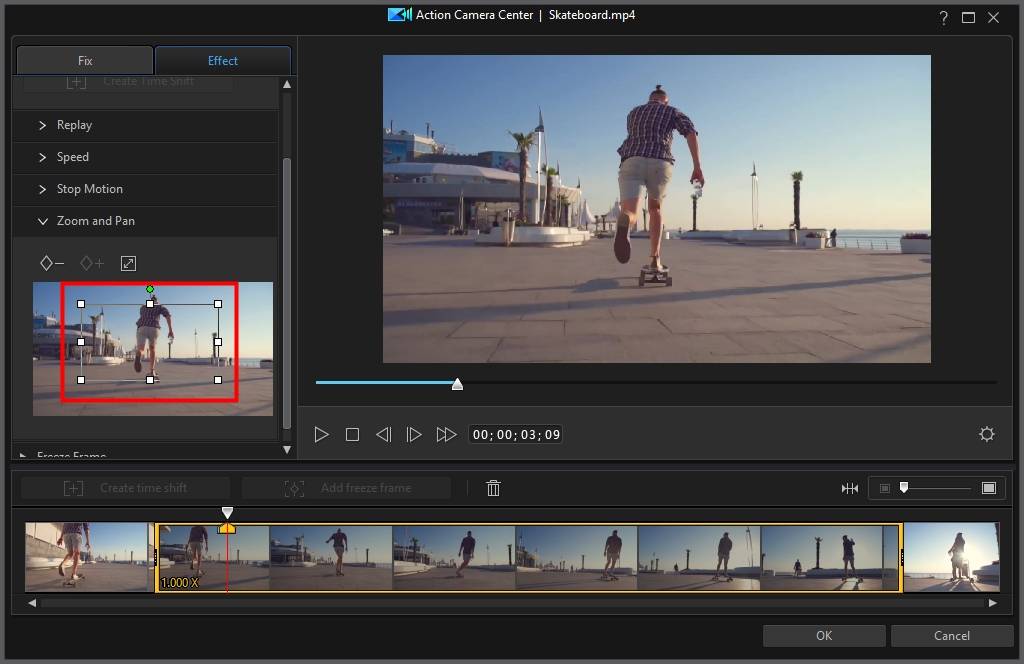
Note: in the above example, the zoom in will begin at the beginning of the time shift. Once the keyframe is reached, the camera will start zooming back out. |
3.If required, you can add more keyframes to customize the effect. For example, you can add another keyframe to hold the zoom, which is done by keeping the focus area box the same size and following the subject (moving the focus area box).
Adding Freeze Frames
Add a freeze frame to pause a frame of video for a specified duration. To add a freeze frame, do this:
1.On the Effect tab, use the player controls or drag the Action Camera Center timeline slider to the position in your video clip where you want the freeze frame.
Note: use the zoom controls above the Action Camera Center timeline to zoom in on the video clip's timeline to more precisely find the frame. |

2.Click on the Add freeze frame button. CyberLink PowerDirector will add a freeze frame, which is indicated by the blue indicator.

3.In the Duration field, enter how long you want the video to pause on this frame of video.
Note: you can add more than one freeze frame to a video clip. Just repeat the above steps to add another. |
Applying Zoom Effect
Select the Apply zoom effect option if you want to zoom in and out on the paused frame of video. Once selected, resize and align the focus box to the part of the video frame where you want the zoom to occur.
Note: if you also selected the Apply replay and reverse option, in the Apply effect to drop down select whether to apply the freeze frame to the first or last play of the time shift segment. |