CyberLink PowerDirector Help
In the Preview window of the Slideshow Creator, click on the Customize button to open the Slideshow Designer to modify the selected slideshow style.
Note: if the Customize button is not available in the Preview window, the slideshow style template you selected cannot be customized in the Slideshow Designer. |

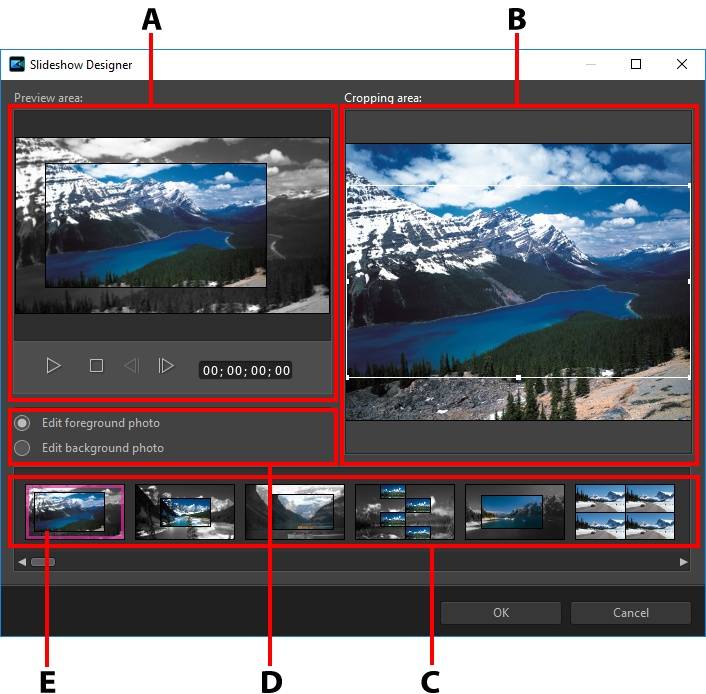
A - Preview Area |
B - Editing Area |
C - Slide Area |
D - Extra Tools Area |
E - Selected Slide |
|
The editing options and tools that are available in the Slideshow Designer, depend on the slideshow style template you selected. The following outlines the editing options available for the style templates that utilize the Slideshow Designer.
Camera/Cell Slideshow
When customizing a Camera or Cell slideshow in the Slideshow Designer, you can perform the following functions:
•in the slide area, click on a specific slideshow slide to view and edit it.
•in the preview area, click and drag a photo to an alternative cell.
•in the editing area (Unused photos), click the Add Photos button to import additional photos for use in the slideshow.
•in the editing area (Unused photos), indicate the maximum number of photos that are displayed on a slide.
•in the editing area, drag and drop the photos from Unused photos to the cell in the preview area where you want it on the slide. You can also highlight a cell by clicking it and use the 
 buttons to add or remove selected photos.
•in the preview area, select a cell with a photo and then click on the  button to set the focus of that cell on a specific portion of the photo. Manually resize and drag the box to set the desired focus area.
•in the extra tools area, click the Remix button to generate a new version of the slideshow.
•in the preview area, use the player controls to preview the slideshow.
Motion Slideshow
When customizing a motion slideshow in the Slideshow Designer, you can perform the following functions:

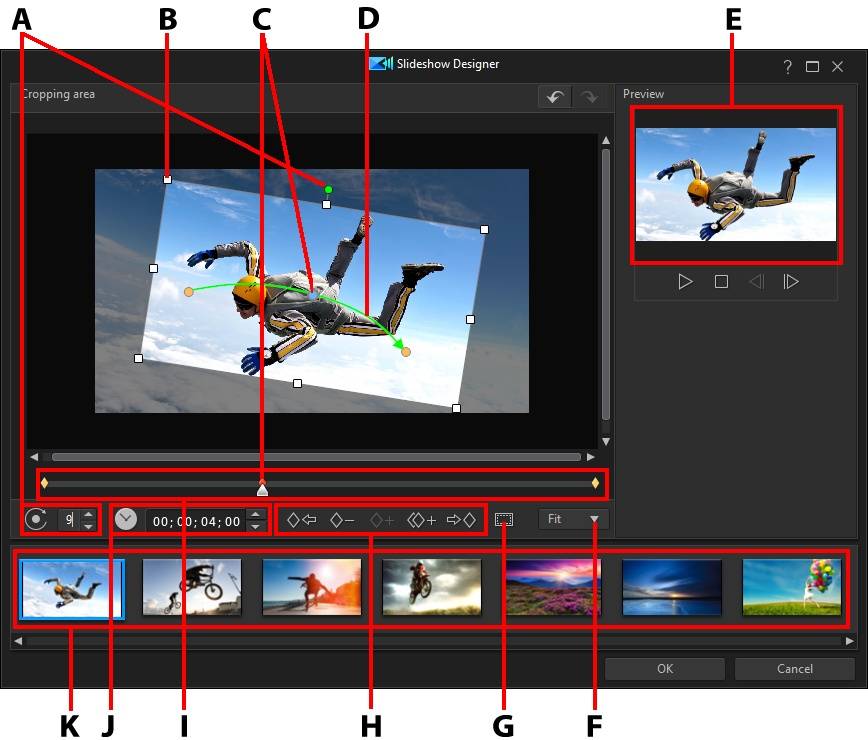
A - Rotate Focus Area |
B - Focus Area |
C - Timeline Indicator/Keyframes |
D - Motion Path |
E - Focus Area Preview |
F - Preview Window Zoom In/Out |
G - TV Safe Zone/Grid Lines |
H - Keyframe Buttons |
I - Keyframe Timeline |
J - Set Slide/Photo Duration |
K - Slide Area |
|
•in the slide area, click on a specific slideshow slide/photo to view and edit it.
•in the  field, set the duration the selected slide/photo will display in the slideshow.
•use the player controls or drag the slider to preview the current motion in the preview window.
•click on  to add keyframes to the keyframe timeline. By adding keyframes you can alter the motion, rotation, or size of the focus area between two points on the keyframe timeline.
•click on  to duplicate the previous or next keyframe on the keyframe timeline. Doing this copies the properties of the specified keyframe to the new position.
•resize the focus area at keyframe positions on the keyframe timeline to define the areas on the image you want to highlight or focus on.
•click and drag the motion path to alter the movement of the focus area.
•add a rotation effect at keyframe positions on the keyframe timeline by entering the rotation amount in the  field and then pressing the Enter key on your keyboard. You can also click and drag
  on top of the focus area to rotate the focus area manually.
•click on to  to zoom in or out on the preview window. Zooming in is useful for precise movement of motion, while you can zoom out if you want to start the motion off screen.
•click on  to use the TV safe zone and grid lines to help with the precise placement of the focus area on the image. Select Snap to Reference Lines to have the focus area snap to the grid lines, TV safe zone, and boundary of the video area.
Highlight Slideshow
When customizing a Highlight slideshow in the Slideshow Designer, you can perform the following functions:
•in the slide area, click on a specific slideshow slide to view and edit it.
•in the extra tools area, select whether you want to edit the foreground or background photo.
•in the editing area (Cropping area), resize and drag the box to the area of the photo you want highlighted on the slide.
•in the preview area, use the player controls to preview the slideshow.
3D/Balloon/Frozen Space/Outer Space Slideshow
When customizing a 3D, Frozen Space, or Future slideshow in the Slideshow Designer, you can perform the following functions:
•in the slide area, click on a specific slideshow slide to view and edit it.
•in the editing area (Cropping area), resize and drag the box to the area of the photo you want highlighted in the photo on the slide.
•click the Replace Background button if you want to import a custom image to use as the slideshow's background.
Note: the slideshow background cannot be replaced for slideshows using the Balloon template. |
•in the preview area, use the player controls to preview the slideshow.
Time-Lapse Slideshow
When customizing a time-lapse slideshow in the Slideshow Designer, you can specify the following settings:
Note: to create a time-lapse slideshow, you need to prepare the photos for it ahead of time. This feature works best with a series of photos taken with a camera that supports time-lapse photography. |
•Duration of each image: in the field provided, specify how long you want each of the imported images to display. Each image can display for as long as 99 frames, or as short as for 1 single video frame.
•For each displayed image, skip: when importing a large number of images that were taken over a period of time, you may find the need to remove some of the images to reduce the slideshow's duration. In the field provided, enter the number of images you want to remove for each displayed image in your slideshow.