CyberLink PowerDirector Help
In the Edit window, you can manually adjust the volume level of individual audio and video clips in the timeline.
Note: for easier audio syncing, you can increase the timeline scale by selecting the Enlarge timeline scale for audio track in Editing Preferences. |
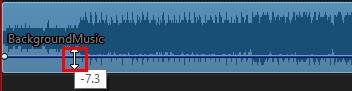
Adjusting Volume for Entire Clip Duration
To adjust the volume level for the entire duration of a clip in the timeline, just click and drag the audio level line up or down as required.

Note: if you want to adjust the volume of all the clips on a specific track at the same time, use the master gain control in the Audio Mixing Room. |
Audio Clipping and Distortion Indicators
If your audio waveform contains yellow markers on it, this is an indication that the audio is clipped or distorted at these points.

Use the volume controls in the Audio Mixing room to lower the volume for the best results. You can also lower the volume directly in the timeline, until the markers are gone.

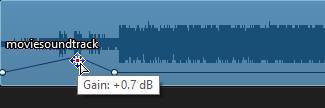
Using Volume Keyframes to Mix Audio Level
If you want to use volume keyframes to mix an individual clip's audio in the timeline, hold down the Ctrl key on your keyboard and then click on the audio level line at the point where you want to change the audio level. Drag the volume keyframe up to increase the volume, or down to decrease the volume.
Note: to remove a volume keyframe, drag it outside the clip's borders. |